
“The more, the merrier,” seems to be the mascot of the world today and it seems to come alive the most while you’re designing a website. Squarespace, one of the world’s best and leading website designing platforms, understands this and provides you with all the resources and tools that you need for your creativity to shine while not forgetting that ‘less’ has its own value.
So while you have more options, more features and more control over your website you also have lesser hassles, lesser complications while shelling lesser bucks from your pocket for all that you get.
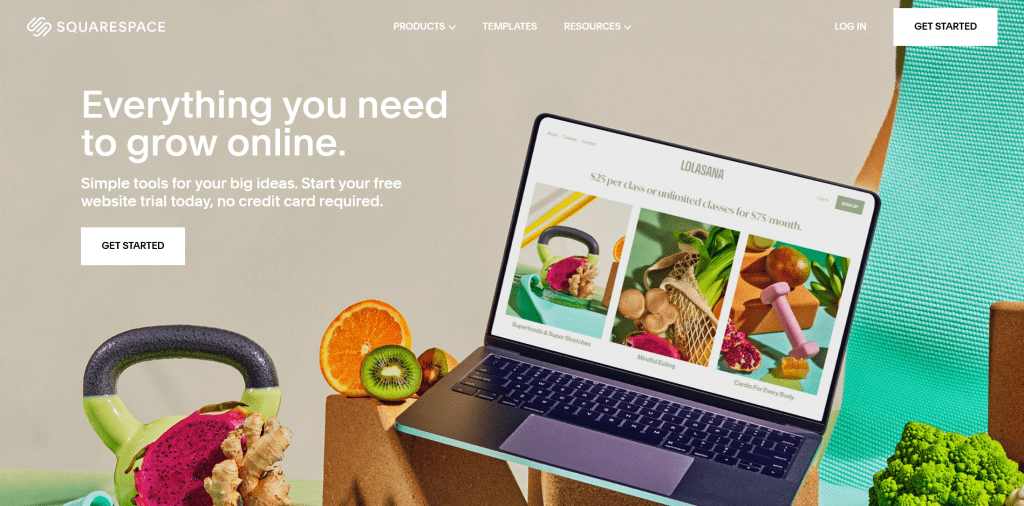
The homepage features all the things that are important for you to get started right away and lists all of Squarespace’s important features, all in one place
In the homepage itself Squarespace defines what it offers which is, “Everything you need to grow online.” But if in any case you are still fretting over how you can actually build your website and host your content, worry no more. Right here are the 8 steps that we’ll go through to understand how to use Squarespace, and use it’s tools to get the most out of it :
Table of Contents
Also check how Squarespace compares to other website builders –
1. Getting to work
So to get started all you need to do is head over to www.squarespace.com and you would find yourself viewing a page like the one mentioned above i.e. it’s homepage. Scrolling down would display you more features of the website, something that we’ll shortly discuss.
More importantly, as a welcome gift, you are presented with a 14 days trial for your website on Squarespace so you can check out all these features that we will discuss and find out whether they fit your needs or not before actually going ahead and making any kind of purchase.
You can sign up for free and will only have to fill out your Credit/Debit Card details when you decide to put your site live.
2. Choosing the right template
Now that you’ve put your designer pants on and got your creative juices flowing, you can then head over to the “Templates” section of the homepage. This is where we actually get set on the path to building our website
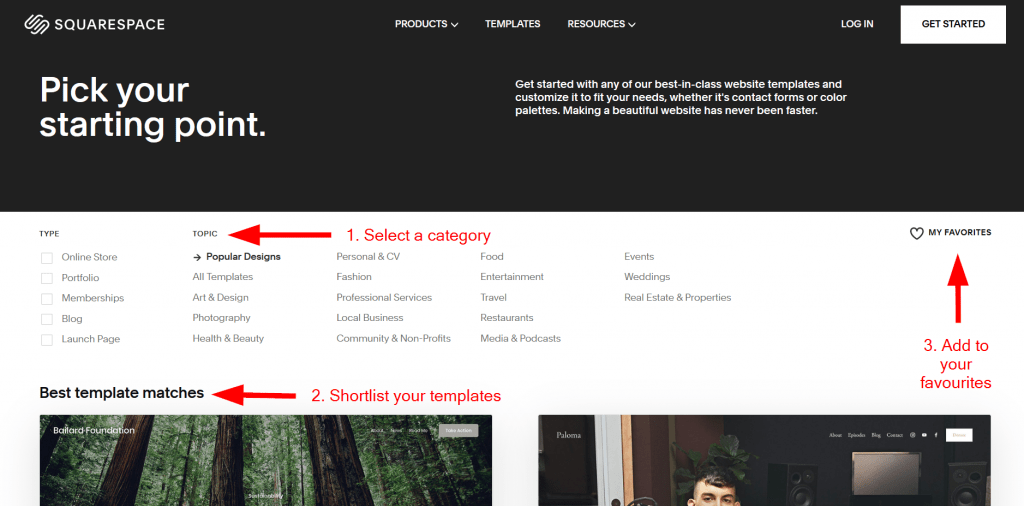
Squarespace offers a wide variety of templates so that you are never short of options, but don’t let that distract you, as each of these designs is better than the last one
Here, you can select from a plethora of templates and even filter all of them down according to what you need, or what it is you’re building your website for. This will help you narrow down your search and show you what kind of templates are best suited for your needs.
Each template is unique in its style, font, layout and animations and while you can change all of these things later, it is a big help if you select the one closest to what you need.
Then, if you are feeling overwhelmed by the amount of choices presented to you (frankly that was the case with me), you can just add the ones you really like to your favourites so you can select out of the best later. Pretty convenient right from the start, isn’t it?
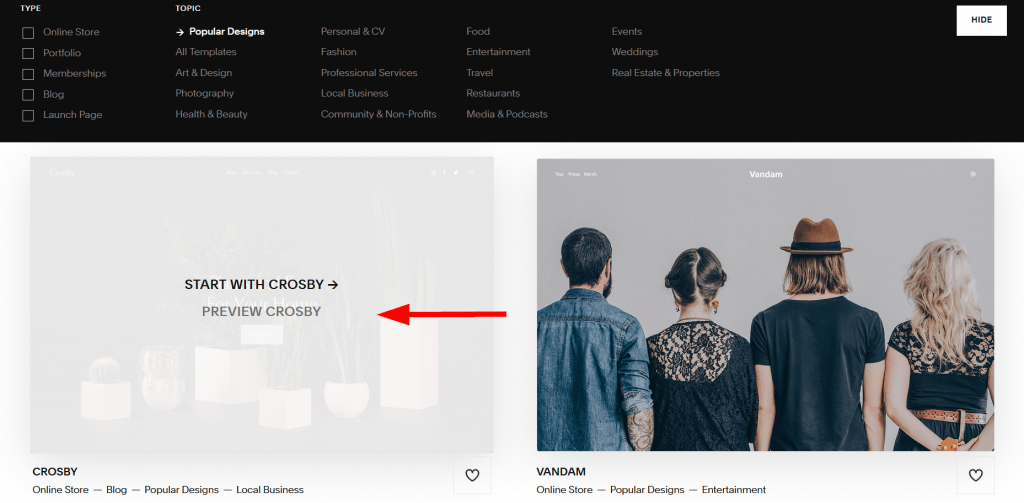
You can even see a Preview of each of these templates so you have the exact idea about each template before you get to work. This also avoids starting everything from scratch again, just in case you don’t like a specific thing in a template.
3. Easily logging-in
Once you have accomplished the seemingly simple but actually mammoth task of choosing your template, you need to sign up to Squarespace.
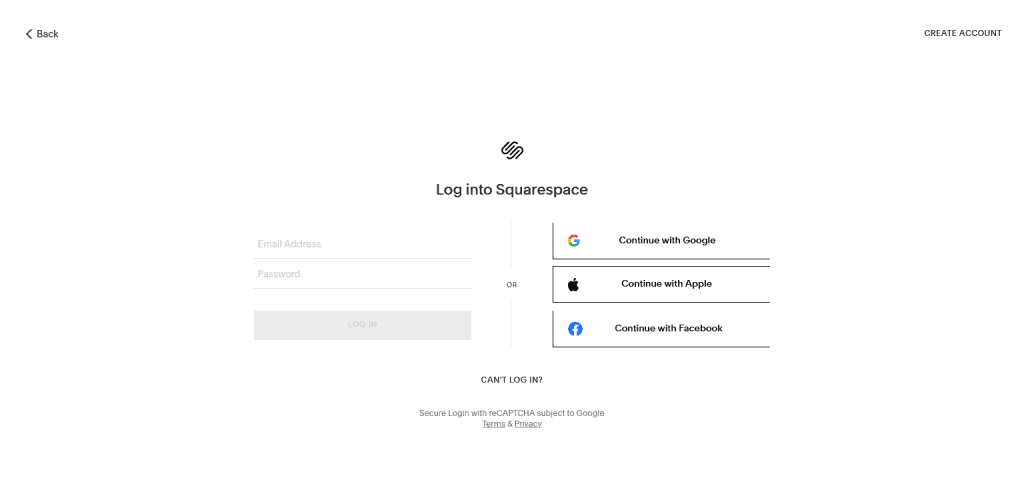
Even though you create your account with a third party website, Squarespace verifies that no one else has access to these accounts of yours before signing you up.
When you see this sophisticated and simple page, you will notice that it has actually got a lot many options. But all these options are here to make it easier for you to get on board.
You don’t necessarily have to go through the ordeal of actually creating an account with Squarespace. You can simply login with your Google, Facebook or Apple account and Squarespace will make your account for you. All you will need to do is go to your mail account, once your account has been created, and verify your email ID. This will help keep your account secure and make sure the email ID is actually being used by you and no one else.
Soon as you’ve completed this step, you will be prompted to give your site a name that aptly describes what your website does or offers.

While it helps to have a title ready for your website beforehand, it is not necessary. You can simply add your content to the website and skip this step so you can add the title later.
A name that stays with people, is crisp and concise is ultimately easy to remember. So make sure your name checks all the right boxes.
4. Managing your pages
So now we are right on track to actually working on building our website, and before that there are some things that we need to set correctly in order to have lesser troubles ahead.
Firstly, we need to ensure that everything we want to put in our website is categorized correctly, for example, if I’m building a creative portfolio that can showcase my writings, photos, and videos apart from my contact information and my social media handles, I need to first add different pages for these different kind of content and information.
All the pages we need might not always be available in the templates that we choose and we will have to manually do that, which leads us to:
As soon as you start working on your site, squarespace is going to offer you the help of its assistant so you don’t miss out on important things related to your website and conveniently access it.
-
Adding pages
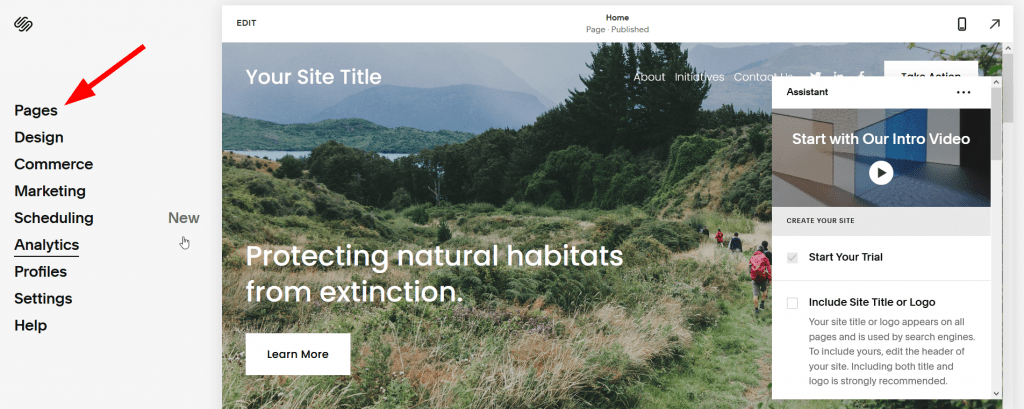
By default, there are only a handful of pages that are available in any given template, so we do have to add some pages to hold the content for us and for our audience to be able to see. All we need to do is click on ‘Pages’ from a number of options that are present in the Main Menu.
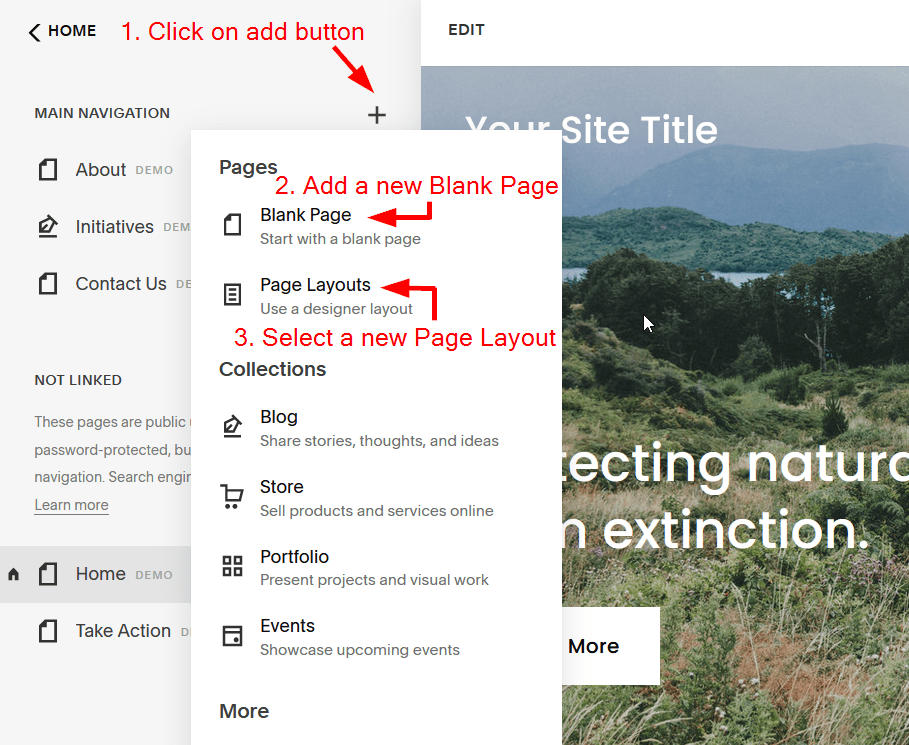
When you click on Pages, you can again see that there is a ‘+’ button to the right of ‘Main Navigation’. Clicking on that will present you with a lot more options, but to keep it simple let’s just go ahead and click on ‘Blank Page’.
When you do that, you will see a new page has been added with just the text present, not even the images that were there in the template already
Editing pages is convenient as you can see all your pages to the left while simultaneously viewing the look and layout of a specific page on the right
Now, while you can make changes to the existing pages, it is more convenient to work on a blank page as it allows you to modify it in whichever way you like. This can also help you in setting the right path for the rest of your pages as well by setting a layout that can be applied to all the pages that you create from here. This leads us to:
-
Setting the right layout
Every website has to have a different layout to add to its distinctness and to serve its purpose. In fact, you can even add different layouts to different pages according to each one’s need.
Doing so is easy, all you need to do is click on that ‘+’ button again and instead of clicking on the ‘Blank Pages’ like we did while adding a new page, click on ‘Page Layouts’. As soon as you do that, you are going to smoothly transitioned to the page that will look like this :
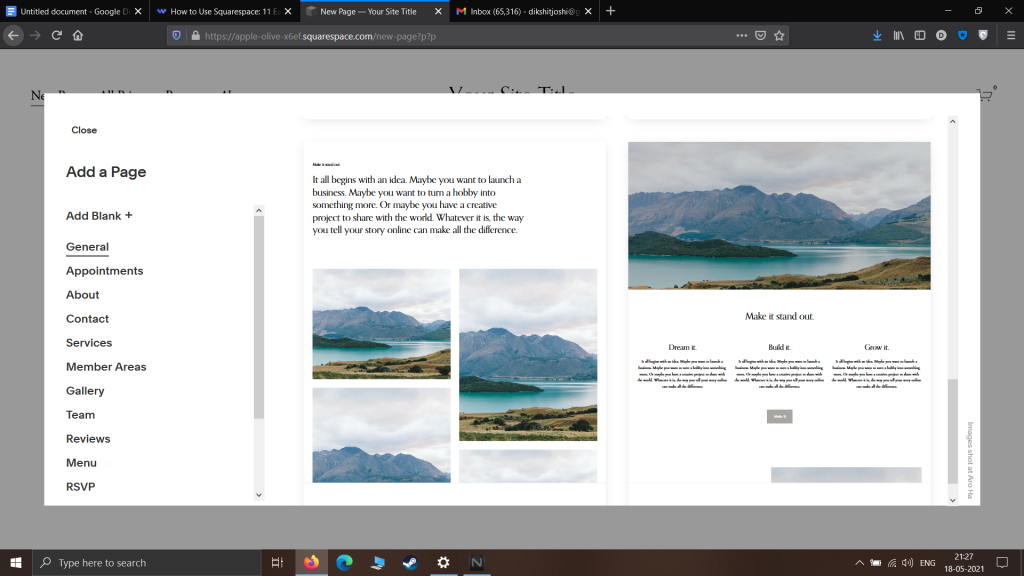
It might take some time to choose the right layout, but when found, it can save you a lot more time while editing it.
Now, all you need to do is search for the layout that appeals to you the most and you think will even appeal to your audience and get going with it. Yes, it is as easy as that.
As soon as you’re done with that, you’re going to see that a new page with your preferred layout has been added to your ‘Main Navigation’ menu.
-
Removing unnecessary pages
Now you know enough about the website you’re building, and you know how you are going to proceed from here to give it the look and feel that you want to. So, you must not forget something which is very essential. If you’re someone like me who likes to give things a clean start and not work on the pre-existing style, then you would want to remove the pages that came along with your template. Doing that is really easy.
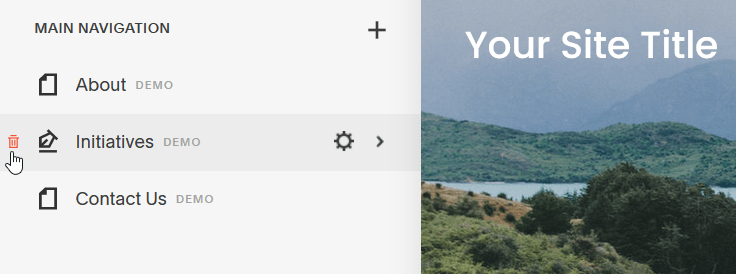
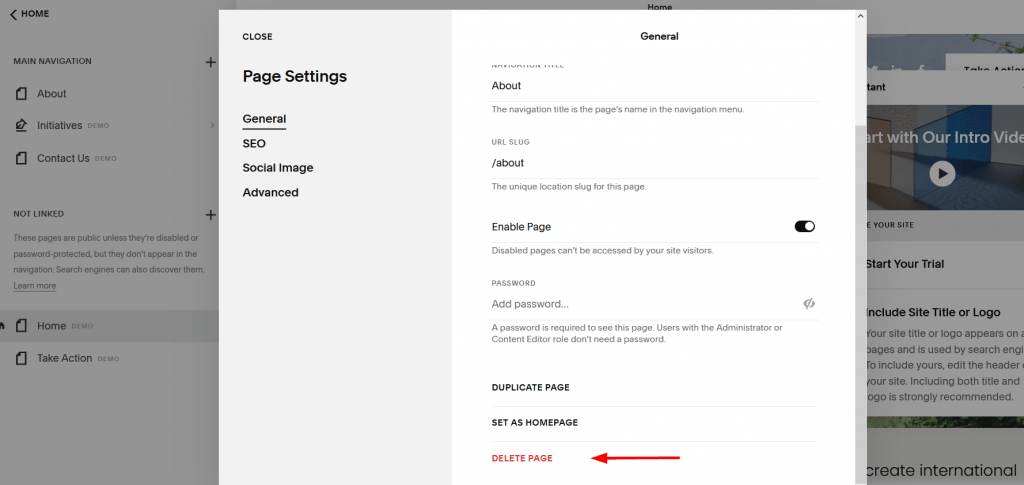
Just hover over the page you want to delete, and when you do you will see that a gear icon on the right and a bin icon on the left is going to appear which stands for individual page settings, and delete page respectively. Yes, you can individually set different settings for different pages on Squarespace, so you can now understand the level of customization this platform has for you.
Coming back to our point, one way of quickly deleting a page is by just hovering over it and clicking on the bin icon, and then pressing ‘Yes’ on the confirmation box that appears. It’s as simple as that!

Every page has a long list of settings and you can make each page more unique than the last through them
Another way of doing this is when you click on the gear icon, this page will appear and in the ‘General’ settings, which is going to be selected by default, you just have to scroll down to the bottom and find that red text that stands out saying ‘Delete Page’. If you click on that a confirmation box will appear and if you click on ‘Yes’, the page will be permanently deleted and will not be visible to your audience anymore. But take a note, through this method the page will get permanently deleted after 30 days.
5. Adding the essential information
Now that you’ve added all the pages that you need to categorize all your content into, you have to actually put your content in and make the website more eye-catchy, colourful and appealing. Let’s see how Squarespace will help us here.
Start by clicking on the ‘Edit’ button present on the top left corner of your current website preview, after doing so the preview of your website enlarges and starts to give you the option of editing the header and footer of the website along with being able to add more sections to your page.
- Adding Header
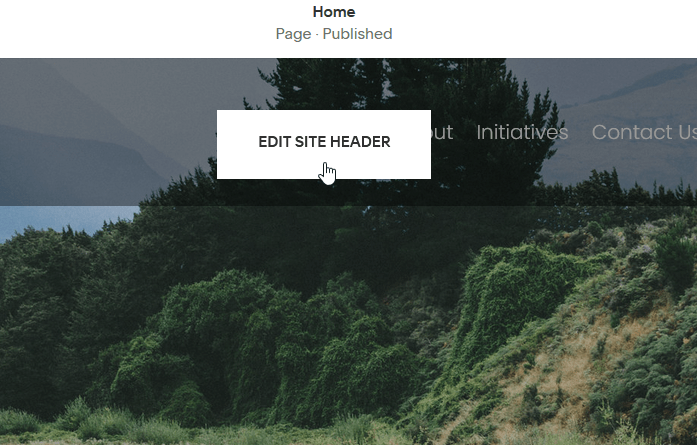
By clicking on the ‘Edit Site Header’, this box is going to appear on the right side of your screen. The one that is of most use to your website right now is adding your logo and making it visible along with the title of your website. Remember, your title and logo are going to be the highlight of your website, so it is necessary to make sure that both of these are captivating and unique and go hand-in-hand with each other.
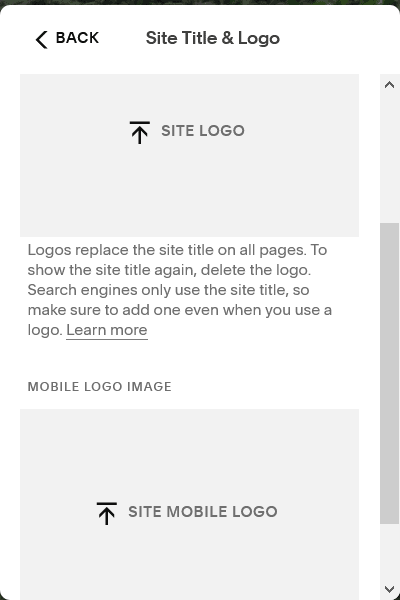
One you click on the ‘Site Title and Logo’ option you will come across an option to add a separate mobile logo if the original logo is a bit big.
Although it is optional to add your mobile logo and site logo both, it is important to understand that your logo will be associated with you, your brand and your website so leaving that idle might not cost you a lot of audience but having a catchy logo will help you gain way more.
It’s interesting how from one place you get the option of customization for your desktop browser and your phone browser at the same time.
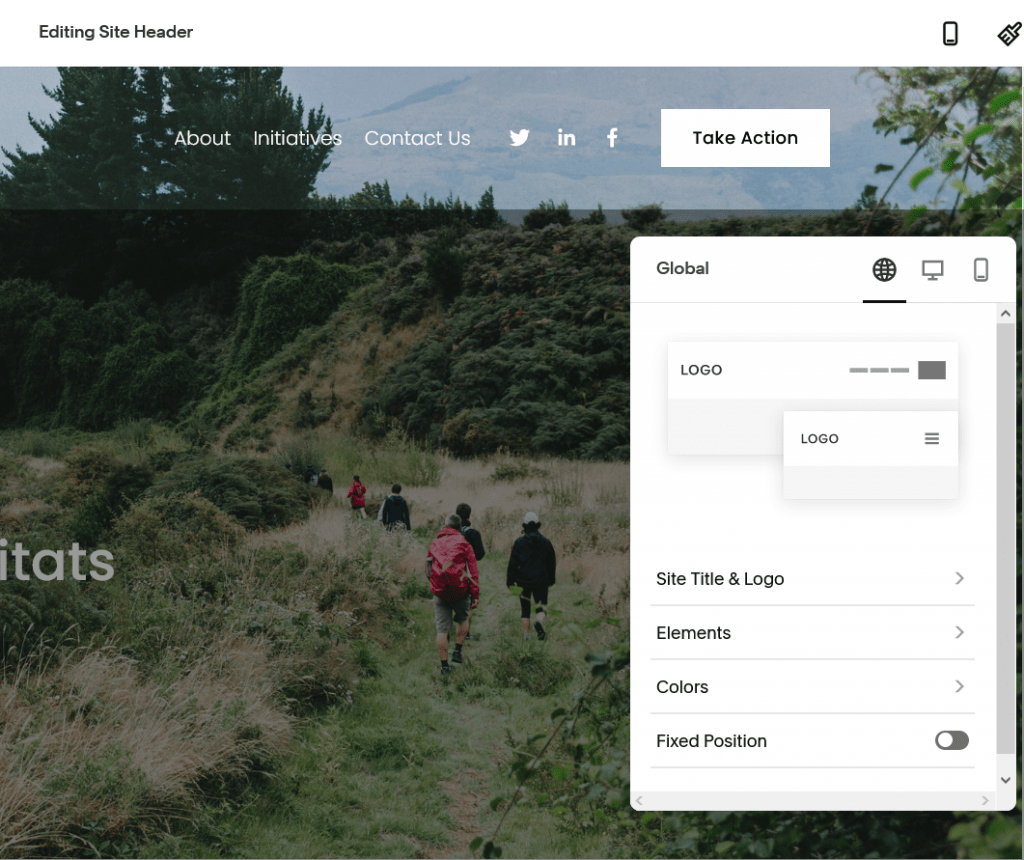
‘Elements’ will help you in adding other attractive things to your site header that can make it easier for people to access and get around it. You can also add your personal and professional social media links right on your header using this option.
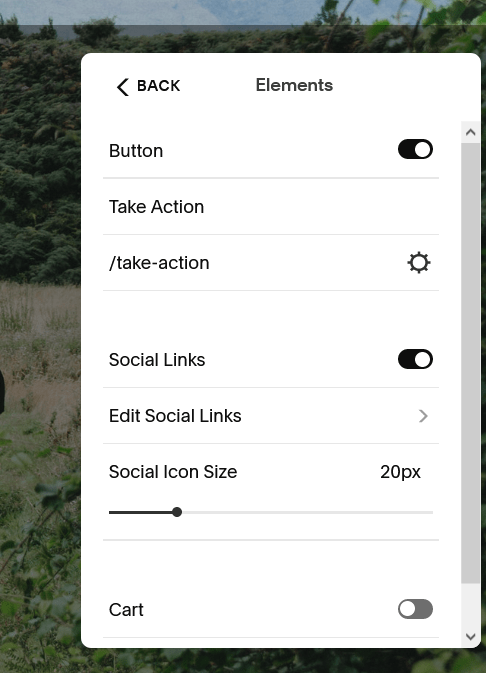
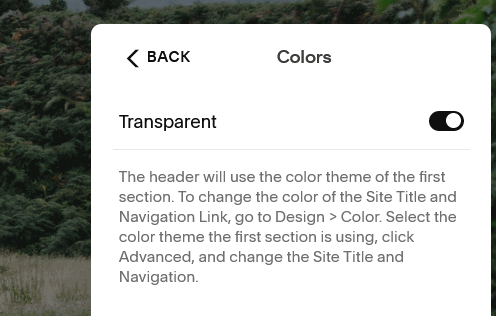
You also have the options of fixing the header at one place and making it visible at all times by clicking on the ‘Fixed Position’ toggle and of giving your header a nice pop of colors by heading to the ‘Colors’ section of this menu.
In a lot of templates, the header is going to be transparent to go with the background of your website, like in the template I have chosen here, but not always. This can also be adjusted in the ‘Colors’ menu.
-
Adding Sections
While headers define your website as a whole these sections are different in every page and will have to be customized accordingly. For eg.If my website is going to hold photos in one of its pages, there is little it will have to do with texts and more with the photographs that I am willing to showcase.
To add new sections all you have to do is just hover anywhere except the header and footer and you will see an option ‘Add Section’. If you click on it, instantly a new section will appear.
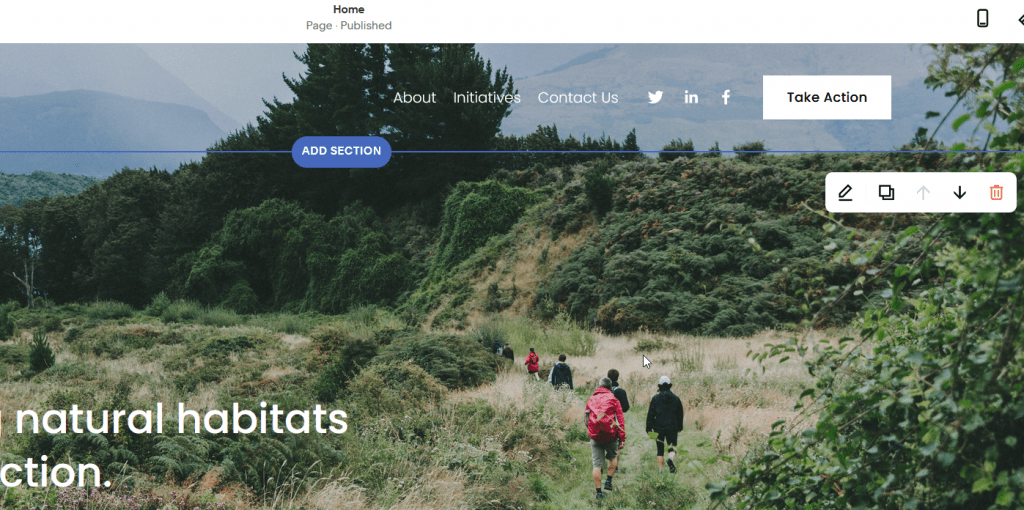
With so many options showcased in such a subtle manner, you are sure to be spending a long time playing with each one.
On the right hand side, you will be able to see more options, like adding text to the current section, making a copy of it, moving down the next section and deleting the current section. You can go ahead and play around with it, or if it is clear enough you can just choose what you want and how you want it to appear on your page.
- Adding Footer
Footer has to be paid close attention to if your website needs to look like a whole and not just good in parts.
An effective footer can help you display a ton of information without showing much and it can also provide a summary of your website through unique methods.
Squarespace has a tremendous amount of options so that you get it right from top to bottom and no part of your website or even a page looks incomplete or as if there’s something missing from it.
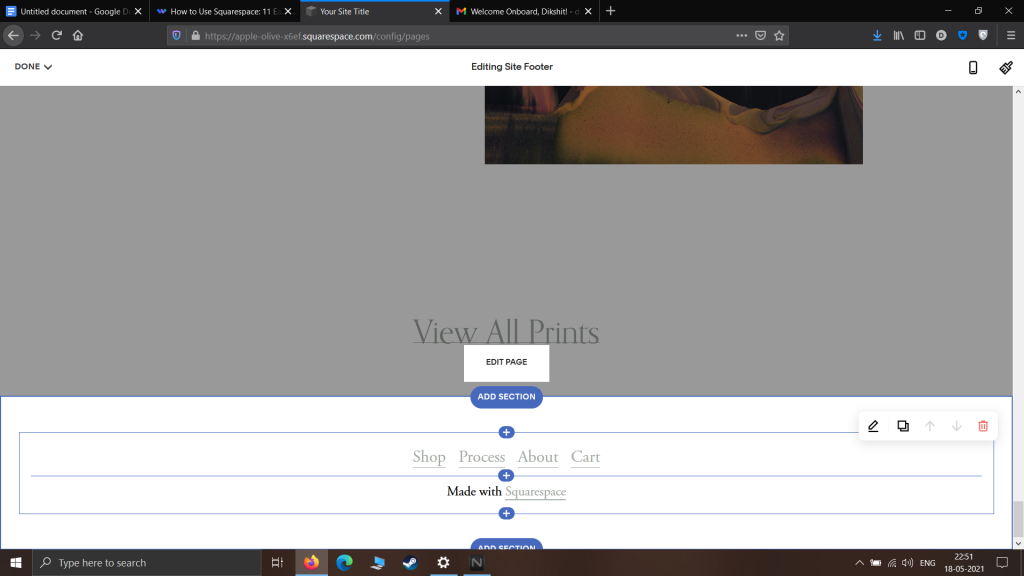
To edit the footer, steps are similar as they were while editing the header, simply hover over the extreme bottom of the page and click on ‘Edit Footer’ and you are going to be see something similar to the image above.
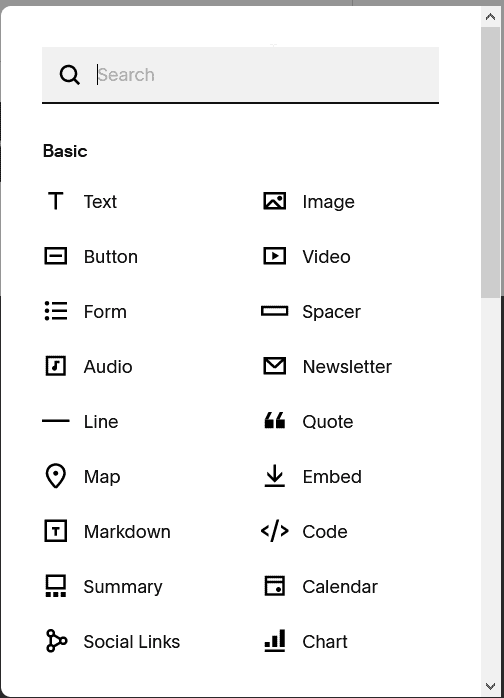
Click on the ‘+’ button to get the wide variety of things that you can add to your footer. From basic text, to audio, to a meaningful quote, to calendar and charts. Almost everything that you can need for your footer to sum up your page and website is present for you to choose from. All you have to do is select the best one according to your need and make your footer as appealing as you want.
6. Branding and designing your website
Now that all the information and content has been added to your website as per your needs, our job is to make sure it looks appealing throughout.
Getting the look and feel right for your website is imperative as it will decide how much time people spend on your website
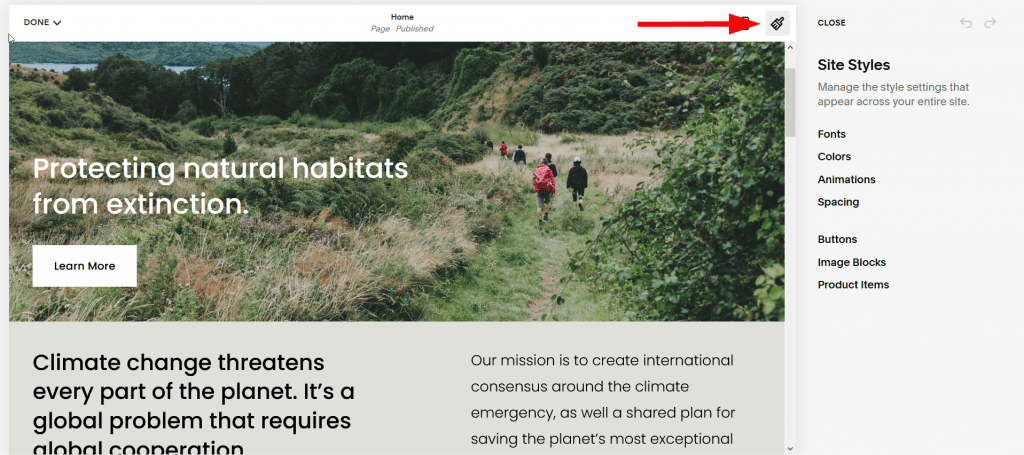
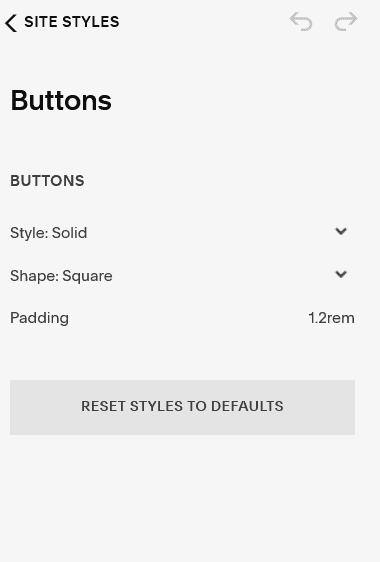
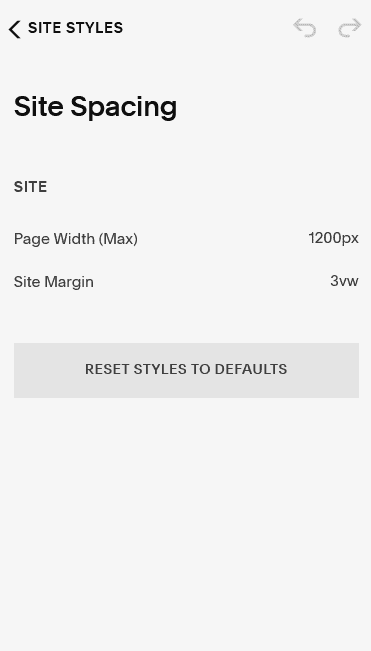
While Editing your website, a paintbrush icon to the top right of your preview would be clearly visible to you. Click on that to come across the menu of ‘Site Styles’ which is going to be presented to you with some options that are not just going to impact a single page of your website but the style of the whole of your website so that it has a unique feel and using it seems convenient, smooth and pleasant.
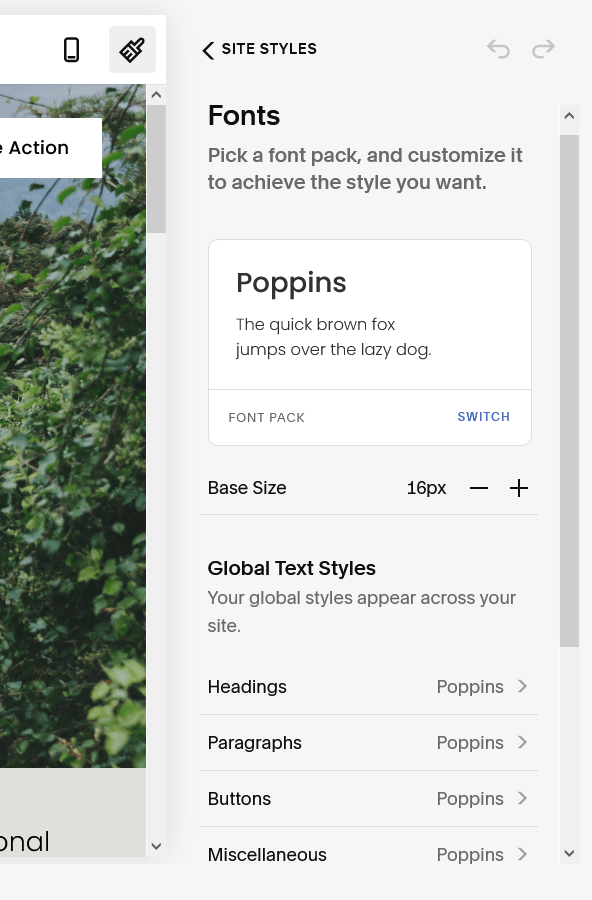
Fonts, as the name says, is going to help you with selecting what kind of font style you want to see across your website. The one you get by default with the template might not always be your preference. You can choose different fonts for different uses for eg. you can have varied fonts for your paragraphs, your headings, buttons etc.
Colors will offer you with a palette of similar colors that will again be uniform to your website but a unique palette can give it a unique look, and even exactly the one you wanna go for. Furthermore, you can customize these palette themes according to your liking as you can see in the screenshot below.
I chose to set my fonts to the default color palette since it naturally blends in with the image and the colours of the website. It
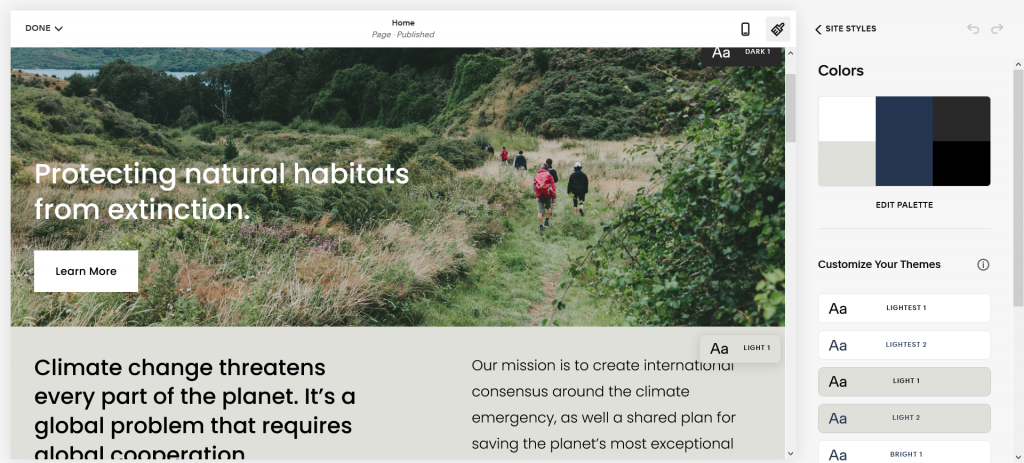
Squarespace offers a wide range of options in its colours menu that is sure to leave you baffled.
One thing that is really admirable about Squarespace is how it even lets you customize the animation or the movement throughout. It might not be the most unique to just this platform but it’s interesting to see how smoothly it carries this out and how easy it is for anyone to play around with it and give their content a different feel.
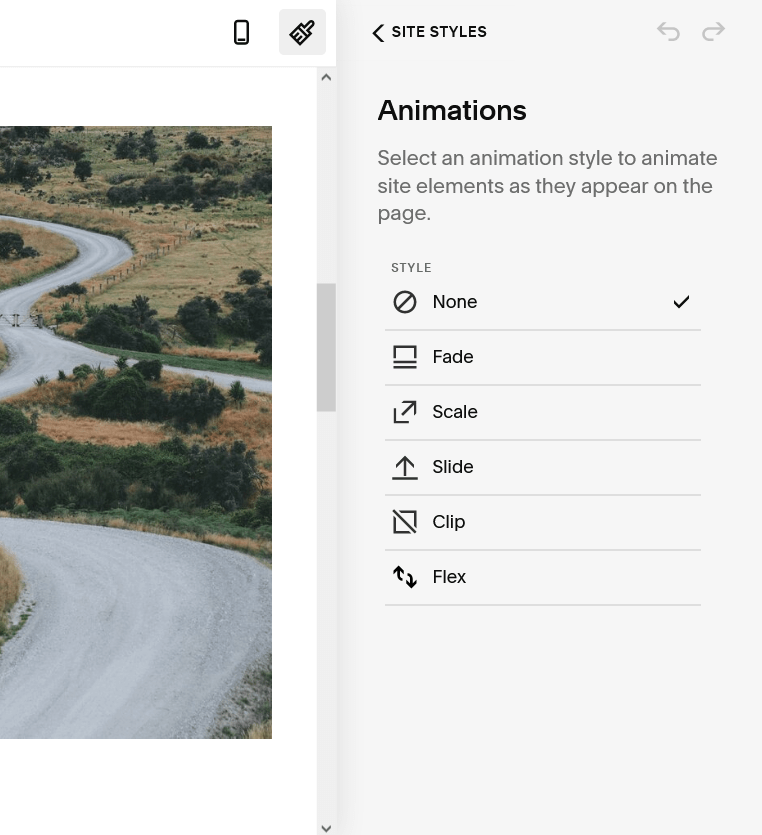
In case you’re wondering what animation would feel right, just head over to your website review and see for yourself which one feels right while using it.
There are many more options that let you customize very minor things like spacing, buttons, image blocks etc that will help you in finalizing those nitty gritty details and getting them just right so that nothing looks even a percent off.
7. Optional but Important things
Now that we’ve listed out all the necessary stuff and have almost covered everything there is to know about this platform that offers us so much, there are some other things that are not everyone’s cup of tea at all times but are those things that when done right can set your website a class apart and make it look actually professional. Let’s quickly cover those before we can move ahead and get your website live and to the right people.
- In the ‘General’ section of Page Settings, you can individually disable some pages so that your audience is unable to view them but they are available for you to edit or extract your content from.
- Under the same settings you can password protect some of your pages, so no one else working on the website can make changes to that specific page.
- You can select custom URLs for each of your pages and have people conveniently remember the address to a specific page if you want it to be visited more than others.
- The people who know how to code can make specific changes to their pages by heading over to the Advanced Section in the same menu where you can inject custom codes and scripts and make very detailed improvements to your page wherever you like.

- Within the same settings you can also see how your page is going to appear over social media handles when shared, but even if these social sharing images are not set up, Squarespace takes the liberty to use your logo and title of the website for the same purposes.
- In the SEO section of these settings you can choose to hide specific pages from search engines. Once you do so, no one will be able to see the selected page on, for eg. a Google search, so the control is entirely yours.
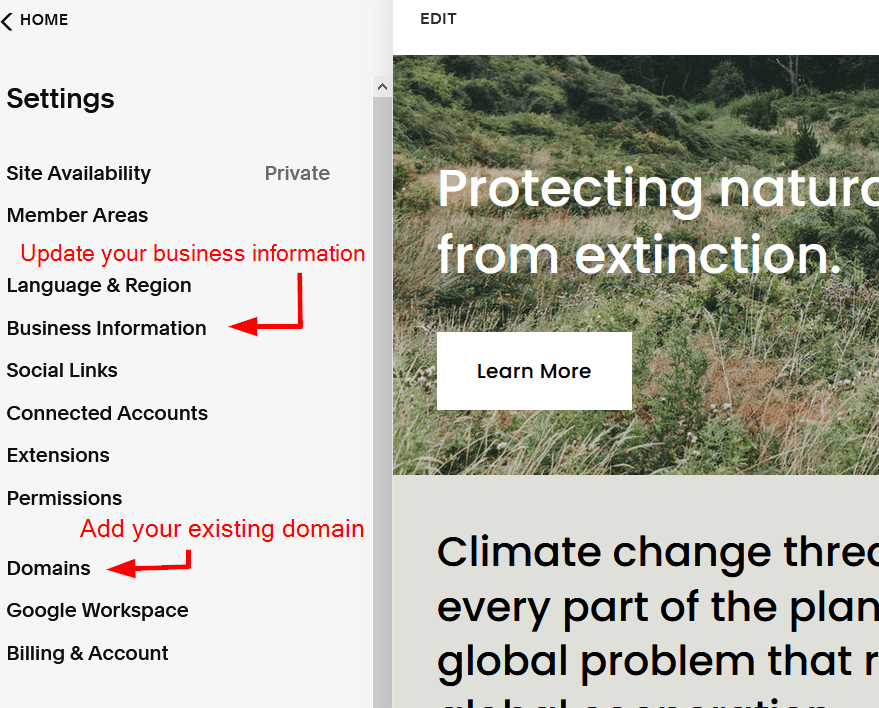
- You can add your personal or business contact information to your website by going to the ‘Settings’ in the Main Menu (not the Main Navigation menu) and going to ‘Business Information’.
- If you are already in possession of a domain, you can use it to host your Squarespace website. Simply go to ‘Settings’ in the Main Menu again, and head over to ‘Domains’ where you will be able to add your domain name.
- You can head over to the ‘Marketing’ section of the Main Menu to check out options that can help you publicise your website better over your business and personal social media handles.

- The same section can also help you in making your website SEO friendly simply by selecting ‘SEO’ in the Marketing section.
- If you’re setting up an e-commerce website or you’re willing to sell things through your website, it is necessary that you go through the Commerce Section of the Main Menu which can help you in setting up everything perfectly so there are no issues regarding Payments or Customer Database etc.
8. The right price plan for you.
By now we have gone through almost all the features and you might have already made up your mind whether or not Squarespace is for you. If you are still a bit skeptical about it then it’s aggressive pricing is surely to get you hooked.
On the bottom of your website at all times you are going to be seeing an option to ‘Subscribe’ which will also tell you how many days you have left before your free trial expires, and as soon as you click on it you’re going to be on this page shown above that is going to be listing down all the plans according to individual needs.

Squarespace offers 4 price plans namely:
Personal – $16/month (or $12/month billed annually)
This plan suits the people looking to build a portfolio website to showcase their content, skills and talent.
Business – $26/month (or $18/month billed annually)
For businesses that are looking to make a professional website that can attract more and more customers and where they can offer their services.
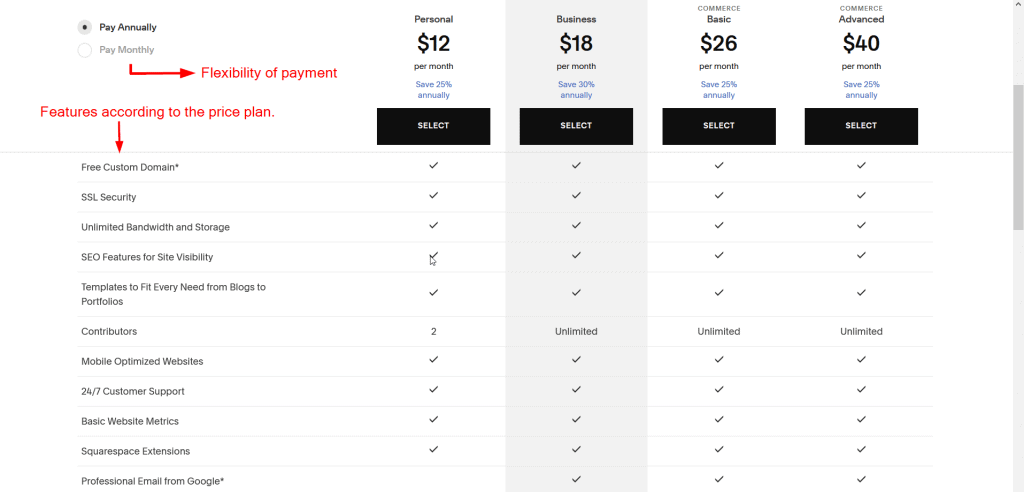
None of these plans charge you extra for a domain, with each plan you get one absolutely free.
Ecommerce Basic – $30/month (or $26/month billed annually)
For e-commerce websites shipping a large number of products but on a relatively smaller scale with basic features to its customers.
Ecommerce Advanced – $46/month (or $40/month billed annually)
For E-commerce brands that are willing to go all out and use Squarespace services to the fullest to get and deliver the highest quality of services and features to anyone.
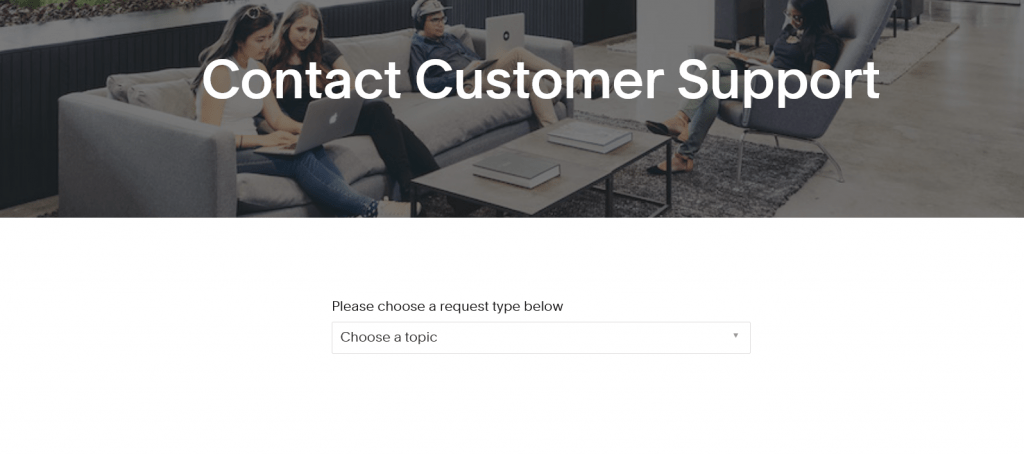
Every plan will get you some benefits and while the more expensive plan will get you a lot more features, it might not be the best one according to you and your use of the website. What is constant across all these plans, though, is Squarespace’s excellent customer support that will never fail to impress you and would serve you whenever you have a problem.
Squarespace offers two kinds of billing options, you can either be billed monthly, or you can choose to be billed once every year. You save about 30% when you choose an annual plan but since that might not be according to everyone’s needs, the monthly plans are also pretty competitive according to the features offered. Needless to say, the customizability doesn’t really end with your website, does it?
Over the course of the past few years, Squarespace has garnered quite a huge name for itself by appealing to almost all kinds of audiences but mostly to those who absolutely adore designs, aesthetics, subtlety and a wide range of options.
You can even check out reviews of many renowned creatives, who have built or at least added to their fortunes using Squarespace, towards the bottom of the homepage.
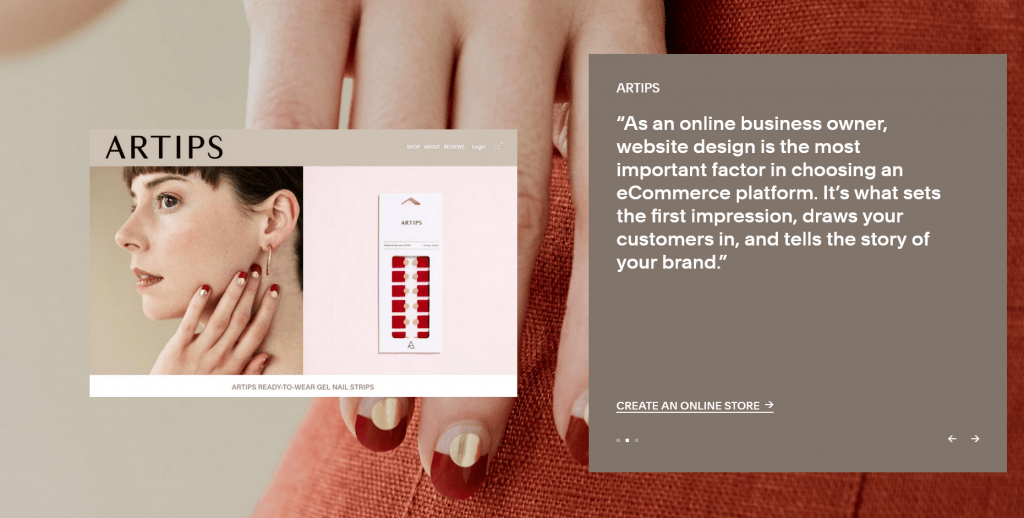
This section helps you to get to know why Squarespace is a popular choice and how other people have used it in so many different ways.
It’s easy-to-use platform and attention to details in design is always going to be unique and something that it will always get right.
If you’re looking for a website builder to create your portfolio website as an artist, check – Best Portfolio Websites